As week 13 was the last week leading up to the Christmas holidays. Because of this not to much was achieved as this was a time allowed for us to relax after a long enduring term. However in the production of this i have advanced by adding a nos tank to place in the vehicle as well as other features like a steering wheel and a brake. Furthermore i have also added treds to the wheels of the car. But for the most part this week i have only added minor details to it.
Week 14
This week i have began the final stage of production being the stage where i texture the car. For the most part this process was tedious. I found it quite easy because the body of the car has a low poly count as well as a UV map that was easy to navigate. In addition to this the vehicle is military so the car's colour scheme was just mostly green. As well as this i found texturing the triple intake bug catcher relatively easy as basic colours would cover their design. Something else i textured that took a significant amount of time was texturing my bottle of nos. This was mainly down to fixing the bottle to make sure the texture wouldn't distort when it was applied.
Showing posts with label 3D modelling. Show all posts
Showing posts with label 3D modelling. Show all posts
Tuesday, 16 January 2018
Tuesday, 12 December 2017
Next gen year 1 week 12
Hello blog
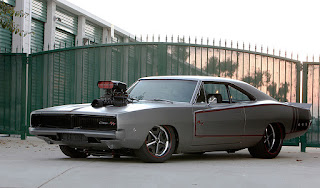
This week was a continuation on last weeks assignment to create a exploratory vehicle. After last week i continued my progress by sculpting the body of the duckw and adding a Boolean to create the inside space for the vehicle. Afterwards i went to create the bonnet for it and adding a PS charger towards it. this is the image i based it upon being the engine part sticking out of the bonnet. The charger there is different from the one i based mine on but this image is a good example of the type of features i wanted in my vehicle.
After this i went on to make a rough wheel for the duckw. For this i went into depth upon the rim of the wheel and not the actual tire because i saw the design for it to be long so at the time I've just left it as a pipe as intend to back to it. For the rim i used the duplicate special tool to add all the bolts to it to perfectly create a circle shape around it.
Afterwards i went on to design the machine gun that would be mounted to the back of it. whilst creating it i found it to be a long and tedious task to create rather than a difficult one. At the end there is a place i wanted to use the curve tool to make the nozzle but couldn't do it and settled for replacing it with cuboids but this is something i want to go back on and improve on if time is on my side.
Another feature of the duckw i went on to make is the propeller placed at the back to make it an aquatic off-road car. This was something i stressed about as i left it for a while i found it easy. I stressed out about the creation of the propeller but all i needed to do was mess around the vertex tool.
Below is a collection of pictures showcasing where i am currently at in designing the duckw.

This week was a continuation on last weeks assignment to create a exploratory vehicle. After last week i continued my progress by sculpting the body of the duckw and adding a Boolean to create the inside space for the vehicle. Afterwards i went to create the bonnet for it and adding a PS charger towards it. this is the image i based it upon being the engine part sticking out of the bonnet. The charger there is different from the one i based mine on but this image is a good example of the type of features i wanted in my vehicle.

After this i went on to make a rough wheel for the duckw. For this i went into depth upon the rim of the wheel and not the actual tire because i saw the design for it to be long so at the time I've just left it as a pipe as intend to back to it. For the rim i used the duplicate special tool to add all the bolts to it to perfectly create a circle shape around it.
Afterwards i went on to design the machine gun that would be mounted to the back of it. whilst creating it i found it to be a long and tedious task to create rather than a difficult one. At the end there is a place i wanted to use the curve tool to make the nozzle but couldn't do it and settled for replacing it with cuboids but this is something i want to go back on and improve on if time is on my side.
Another feature of the duckw i went on to make is the propeller placed at the back to make it an aquatic off-road car. This was something i stressed about as i left it for a while i found it easy. I stressed out about the creation of the propeller but all i needed to do was mess around the vertex tool.
Below is a collection of pictures showcasing where i am currently at in designing the duckw.


Tuesday, 5 December 2017
Next Gen year 1 week 11
Hello blog
This week i was given my final assignment. This task was to create my own exploratory vehicle. To start this i went into power point to create a mood board. For this i filled up a slide of vehicles i liked and features that it would contain. This was created to give me inspiration for an overall idea for what my vehicle will be and what it will have in it.
From there i went into Photoshop to photo bash an image. This is the process of adding different pictures together to get a basic idea of what my vehicle would look like. The car in which i am basing my vehicle off is the DUCKW which is an amphibious WW2 car. In addition to this i wanted to add other features like a roll cage and a Supercharged Chrysler 426 Hemi V-8. Whilst this isn't a professionally attempted photo this was more than enough to base my MAYA work off.

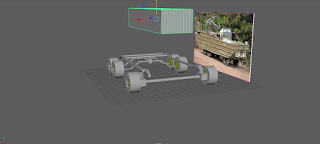 The next thing i did was to use MAYA to build it. At the time i couldn't find any blueprints to the DUCKW so i instead crated the base by using the blueprints for the Mercedes-Benz G63 AMG 6*6 because they are both six wheeled cars. Whilst creating this wasn't necessary i personally found it comforting to create as i used the base to structure the body off of as well as the rest of the car.
.
Tuesday, 28 November 2017
Next Gen year 1 week 10
Hello blog
This week we were set a penultimate weekly assignment before our big task. The task for this week was to design a fidget spinner. For this we also learnt an additional tool that could help us which was the curve tool. However i noticed while creating it this tool was not of use to me as by adding more sub-divisions it only became more of an distorted object. As of yet i have been unable to find the resolution but will look into it.

This is the first one i created. For this I used a basic cylinder and went into the duplicate special menu to create 3 identical cylinders all the same amount of degrees away from one another. As I have previously mentioned i was unable to show off the new curve skill which i learnt so i tried a different method. For this i added a large cylinder in the middle to 3 other smaller cylinders. I then went to edit the mesh by going to the Boolean's and taking away the difference creating the arms which connected to the center piece. Whilst the outcome for the arms look terrible it was all I had to work with.
 My second undoubtedly resembles the look of the first one. This is only the case because I wanted to texture the center piece so I just added a brand of a celebrity to it.

The third spinner i created is fairly easy and self explanatory on how it was designed. For this i just made 2 legs which i just duplicated to make the spider.
 For this last one I used a block which i smoothed down and changed the sub division count. This is because i changed the block into the shape by changing the vertices to form the shape. As well as this i also did the same process to shape the blue part of the spinner. The only other noticeable thing is the Boole ans i added to create the holes.
Overall this has been a satisfactory final product but i am not pleased with it. This is mainly down to to the curve tool so if i were to do it again i'd try to find a resolution. If it still wouldn't work i'd continue using Boolean's until i create arms which don't look so horrendous.
This week we were set a penultimate weekly assignment before our big task. The task for this week was to design a fidget spinner. For this we also learnt an additional tool that could help us which was the curve tool. However i noticed while creating it this tool was not of use to me as by adding more sub-divisions it only became more of an distorted object. As of yet i have been unable to find the resolution but will look into it.

This is the first one i created. For this I used a basic cylinder and went into the duplicate special menu to create 3 identical cylinders all the same amount of degrees away from one another. As I have previously mentioned i was unable to show off the new curve skill which i learnt so i tried a different method. For this i added a large cylinder in the middle to 3 other smaller cylinders. I then went to edit the mesh by going to the Boolean's and taking away the difference creating the arms which connected to the center piece. Whilst the outcome for the arms look terrible it was all I had to work with.


The third spinner i created is fairly easy and self explanatory on how it was designed. For this i just made 2 legs which i just duplicated to make the spider.

Overall this has been a satisfactory final product but i am not pleased with it. This is mainly down to to the curve tool so if i were to do it again i'd try to find a resolution. If it still wouldn't work i'd continue using Boolean's until i create arms which don't look so horrendous.
Tuesday, 21 November 2017
Next Gen year 1 week 9
Hi again it's me.
This week we were given the task of creating and texturing a jet pack on MAYA. For this i could either create something or base the image of an existing one. As my knowledge of jet packs is very limited I chose to base it off of the MARVEL character Falcon by combing his 2 wing suit jet packs.

Whilst creating this i struggled a lot on finding a starting point. Whilst doing it i found that the easiest part was creating the body to it because it doesn't require that much effort to create it. The areas in which i struggled with are the jets. This is because it took many attempts to get right. Whilst this wasn't hard i found redoing it to be tedious and frustrating. In addition to this I also don't like how i designed the wings.
On the whole i am quiet displeased with how the final project turned out. If i was to do this again i'd either wedge or extrude a pipe to create the wing line as it came out as rather rigid. Moreover i think i could use more time to improve the wingspan. As well as this i believe more textures can be used to make it more innovative as well as demonstrate range.In addition to this in the pre-production phase i would find a better image to base the work off as i based it of 3 images which in hindsight was a terrible idea.
Tuesday, 14 November 2017
Next Gen year 1 week 8
Hello blog
This week I was given the task of creating my own tower and to sculpt it on MAYA. Before i were to do this though i had to go on Photoshop to create a tower out of already existing images, known as photo bashing. For this I placed a picture of a water tower and added other images to it to create a weird fantasy tower.
When making the tower I started by adding in all of the objects to overall resemble the shape. Then from there i went into to details, specifically building a small turret on the side. Overall on this project creating the turret was the most time consuming part because it was the most detailed as well as the fact i allocated a lot of time to the base of it. Then from there I went on to texture it which was the easiest part as i didn't run into too much trouble whilst doing it.

Overall i Believe i used an okay amount of techniques and methods whilst creating it. I also like the turret I added to it mainly because of how that is what i spent the most time and went in depth to.
If i had to redo this I would allow myself to spend more time on Photoshop photo bashing to come up with a more creative tower. In addition to this if i had more time i would use it to create reflective windows to make the tower more realistic.
Tuesday, 7 November 2017
Next Gen year 1 week 7
Hello blog
Today in MAYA i was taught more about textures and bump mapping. Bump mapping is choosing a texture to add to your object like granite or leather resulting in the appearance differing due to the new texture. in addition to this we were also taught other special effects and options possibly required to texturing an object..Afterwards the class was split up to each create 1 of the 4 elements assigned to them. For this i was assigned the element of fire. For this i created 4 generic spheres. I individually changed them all to create 4 un-identical spheres which each resemble fire by having different bump maps, transparency's and glowing effects to create my final product after rendering it.
On the whole i am proud with how it has turned out as the orbs represent the same element whilst also using varied effects. Overall my biggest negative for this occurred in the pre production phase of the assignment as when it was set it took me a while to comprehend what the task was but as i got on i found this to be a fun and simpler task.
In the next day on MAYA i was doing character rigs and animating them into poses. For this I was shown 2 poses and had to move the character rig to fit them. The poses i were given was a high jump kick and a bicycle kick which i replicated. Whilst doing this i found it entertaining. Despite this whilst doing it i found moving the characters legs a nightmare as they would just reset sometimes causing me to repeatedly attempt to fix it.


Today in MAYA i was taught more about textures and bump mapping. Bump mapping is choosing a texture to add to your object like granite or leather resulting in the appearance differing due to the new texture. in addition to this we were also taught other special effects and options possibly required to texturing an object..Afterwards the class was split up to each create 1 of the 4 elements assigned to them. For this i was assigned the element of fire. For this i created 4 generic spheres. I individually changed them all to create 4 un-identical spheres which each resemble fire by having different bump maps, transparency's and glowing effects to create my final product after rendering it.
 |
| Before render |
 |
| After render |
On the whole i am proud with how it has turned out as the orbs represent the same element whilst also using varied effects. Overall my biggest negative for this occurred in the pre production phase of the assignment as when it was set it took me a while to comprehend what the task was but as i got on i found this to be a fun and simpler task.
In the next day on MAYA i was doing character rigs and animating them into poses. For this I was shown 2 poses and had to move the character rig to fit them. The poses i were given was a high jump kick and a bicycle kick which i replicated. Whilst doing this i found it entertaining. Despite this whilst doing it i found moving the characters legs a nightmare as they would just reset sometimes causing me to repeatedly attempt to fix it.


Tuesday, 31 October 2017
Next Gen year 1 week 6
Hello blog
 On Monday we again were learning more about the various tools in MAYA. This time we learnt more about different types of materials. Specifically, the Blinn. This is a material which is reflective towards light and gives a metallic look towards objects. I then created a a cube and textured it to make it look like a die. However afterwards didn't go to plan. What i was meant to do was create another layer of the texture using just the die spots and lower its transparency to make the spots see-through. However i fell behind due to my first die having a bad texture thus creating this as my final product.
 Afterwards I was then given the task of creating a building to give reflective windows. For this I needed to get a texture of a building and add it to the net using Photoshop. I then had to fix its UV map to stop distortion in the UV editor. Whilst I encountered it I struggled at first but managed to make sense of its purpose. Next I then made a different layer for the windows and added it to my building making the windows a Blinn material.
 On the Tuesday i brought up my previous work of my castle to texture it. Whilst doing it my only issue of this was the UV map for this. Overall i am very proud of this because of the catapult I created to go with it and how it looks like a replica of the one I base it upon.

On Fridays lesson we continued using the unity engine to create games. This time we had to create a survival shooter game. Overall i am rather displeased with creating it as all the assets I used were just imported from the website making it feel unoriginal. Furthermore with the tutorials I am being told essentially to break down the game only to rebuild it which overall displeases me. Anyway doing it seems like it can help me so i have started it and i'm just in need to finish it.

 On Monday we again were learning more about the various tools in MAYA. This time we learnt more about different types of materials. Specifically, the Blinn. This is a material which is reflective towards light and gives a metallic look towards objects. I then created a a cube and textured it to make it look like a die. However afterwards didn't go to plan. What i was meant to do was create another layer of the texture using just the die spots and lower its transparency to make the spots see-through. However i fell behind due to my first die having a bad texture thus creating this as my final product.
 Afterwards I was then given the task of creating a building to give reflective windows. For this I needed to get a texture of a building and add it to the net using Photoshop. I then had to fix its UV map to stop distortion in the UV editor. Whilst I encountered it I struggled at first but managed to make sense of its purpose. Next I then made a different layer for the windows and added it to my building making the windows a Blinn material.
 On the Tuesday i brought up my previous work of my castle to texture it. Whilst doing it my only issue of this was the UV map for this. Overall i am very proud of this because of the catapult I created to go with it and how it looks like a replica of the one I base it upon.
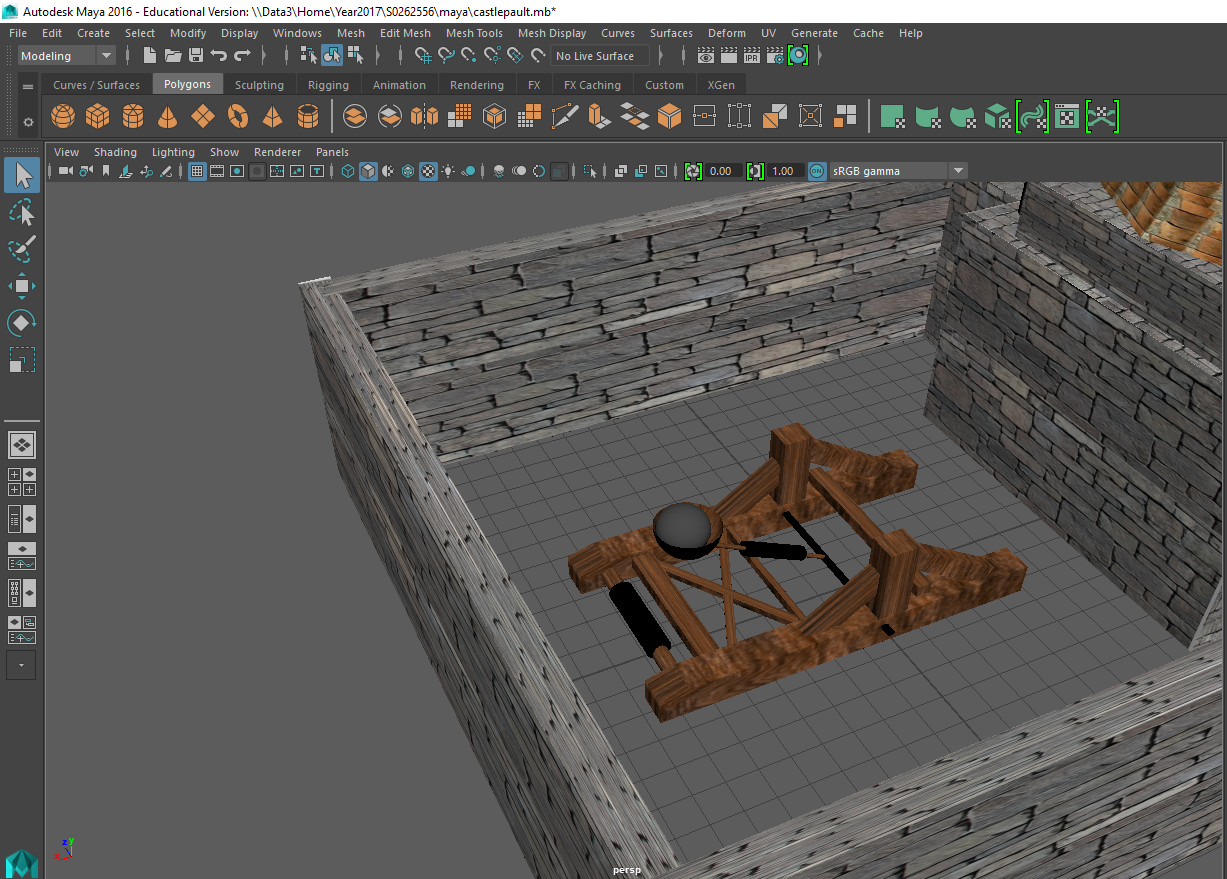
On Fridays lesson we continued using the unity engine to create games. This time we had to create a survival shooter game. Overall i am rather displeased with creating it as all the assets I used were just imported from the website making it feel unoriginal. Furthermore with the tutorials I am being told essentially to break down the game only to rebuild it which overall displeases me. Anyway doing it seems like it can help me so i have started it and i'm just in need to finish it.

Tuesday, 17 October 2017
Next Gen year 1 week 5
Hello Blog
On Monday of this week we continued to develop our skills in MAYA. The skill that we were taught was texturing. This is the skill where you add colours and pictures to objects in the program. Using this tool was quite easy to understand. However if the image you used comes out distorted you will then have to UV map it. this was something which took me a while to wrap my head around but if the image is distorted you need to assign and co ordinate the shape net to Aline it up properly. At the end of the day we were set our weekly assignment. For this we had to design and texture a crate.

As you can see the image to my left is my final product. For this i needed to take a picture of the net of the cube so that i could go on Photoshop
to place the image six times across all six faces. From there i went on to MAYA to extrude the edges to stand out as well as creating a 3D version of the diagonal piece of wood and finally adding many black spheres in to represent the bolts in the create.
 Overall i am quite pleased with how it came out as to me it looks quite realistic. Next time to improve my work i would use a Blinn material to absorb and reflect light as well as other add other minor extra features to upgrade the quality of the work.
During Fridays lesson we had to design a basic game called "roll a ball" using the Unity engine to design it. To my surprise i ended up at a disadvantage which shocked me as, I spent Thursday designing it. I had encountered an error resulting in the program being unable to load up various parts of the game. This then meant i had to redo a large majority of the game for it to fully function.

This is how the game turned out. The white walls and blue floor are the games environment with the walls in place to prevent the ball leaving the environment. The white ball is the player. The last part are the rotating yellow cubes. These are pick up items with the objective being to collect them all to win.
Whilst creating it i had to use code to make scripts instructing the player, the pick ups and the camera to different things. this included attaching the main camera to follow the player around. In addition to this scripts were also required to make the picks rotate and vanish when collided with as well as a script of code being needed to make the player move.
In summary i am satisfied by my game. I'd say for my first time at making a came it has came out dandy. The main issue is the tutorials required to create these as they don't always include ever detail in order to create it as well as the tutorials are rather quick. I believe the only way to improve a project like this is through time and experience on the unity engine.
On Monday of this week we continued to develop our skills in MAYA. The skill that we were taught was texturing. This is the skill where you add colours and pictures to objects in the program. Using this tool was quite easy to understand. However if the image you used comes out distorted you will then have to UV map it. this was something which took me a while to wrap my head around but if the image is distorted you need to assign and co ordinate the shape net to Aline it up properly. At the end of the day we were set our weekly assignment. For this we had to design and texture a crate.

As you can see the image to my left is my final product. For this i needed to take a picture of the net of the cube so that i could go on Photoshop
to place the image six times across all six faces. From there i went on to MAYA to extrude the edges to stand out as well as creating a 3D version of the diagonal piece of wood and finally adding many black spheres in to represent the bolts in the create.
 Overall i am quite pleased with how it came out as to me it looks quite realistic. Next time to improve my work i would use a Blinn material to absorb and reflect light as well as other add other minor extra features to upgrade the quality of the work.
During Fridays lesson we had to design a basic game called "roll a ball" using the Unity engine to design it. To my surprise i ended up at a disadvantage which shocked me as, I spent Thursday designing it. I had encountered an error resulting in the program being unable to load up various parts of the game. This then meant i had to redo a large majority of the game for it to fully function.
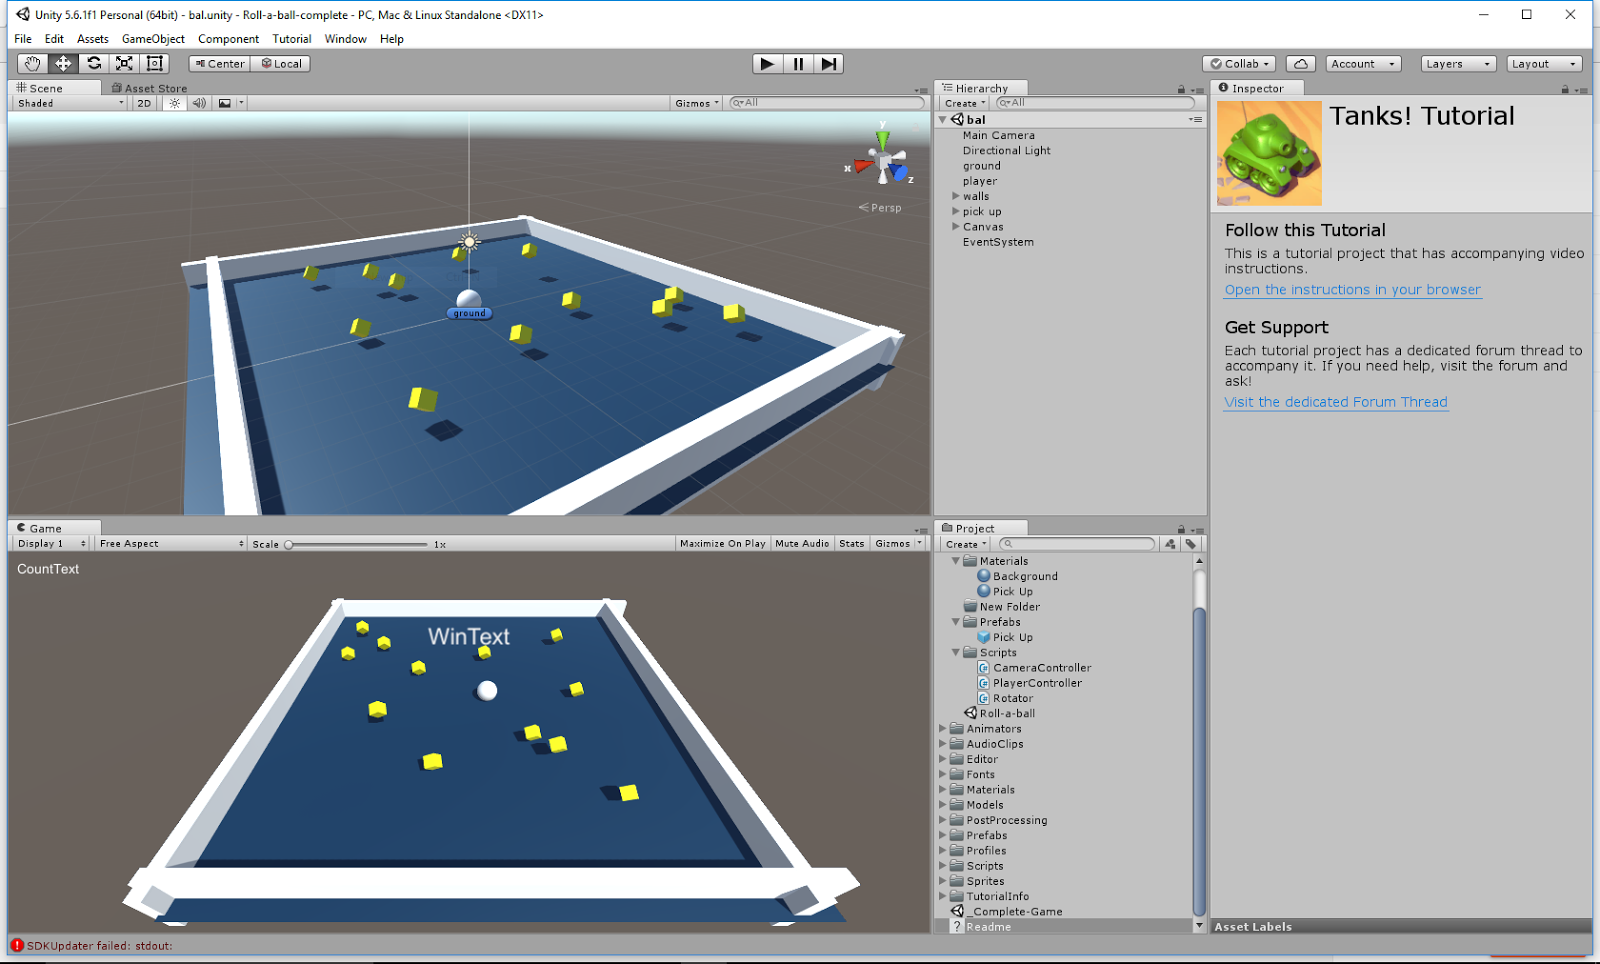
This is how the game turned out. The white walls and blue floor are the games environment with the walls in place to prevent the ball leaving the environment. The white ball is the player. The last part are the rotating yellow cubes. These are pick up items with the objective being to collect them all to win.
Whilst creating it i had to use code to make scripts instructing the player, the pick ups and the camera to different things. this included attaching the main camera to follow the player around. In addition to this scripts were also required to make the picks rotate and vanish when collided with as well as a script of code being needed to make the player move.
In summary i am satisfied by my game. I'd say for my first time at making a came it has came out dandy. The main issue is the tutorials required to create these as they don't always include ever detail in order to create it as well as the tutorials are rather quick. I believe the only way to improve a project like this is through time and experience on the unity engine.
Tuesday, 10 October 2017
Next Gen year 1 week 4
Greetings
This week on Monday we continued using tools in MAYA to develop our 3D sculpting skills. We learnt to use the skills of extruding and and how to bevel shapes. In addition to this I also learnt how to add images to the program to use as blueprint whilst sculpting. The final tool we learnt that week was inserting edge loops. this tool i struggled with at first but have gotten to grips with.
After getting to know the tools we were then given the task of creating Mjornir. to those unfamiliar it is the hammer wielded by the god of thunder.

As you can see this is my final product. whilst making it i used all the tools i learnt like extruding the sides of the head to get the shape. I then beveled the head after that to give it its round feel.
Overall i am proud of my assignment and really enjoyed myself creating this. I enjoyed it because it wasn't the most frustrating and i am a fan of the film this hammer model is based on. as well as this really like the lightning background i added.
Despite this if it were to be done again i believe i would get involved in edge looping more as i tried to avoid it. Furthermore i would spend more time on creating the hilt and attempt to use special patterns to make the leather handle and overall cut procrastination to a minimum.
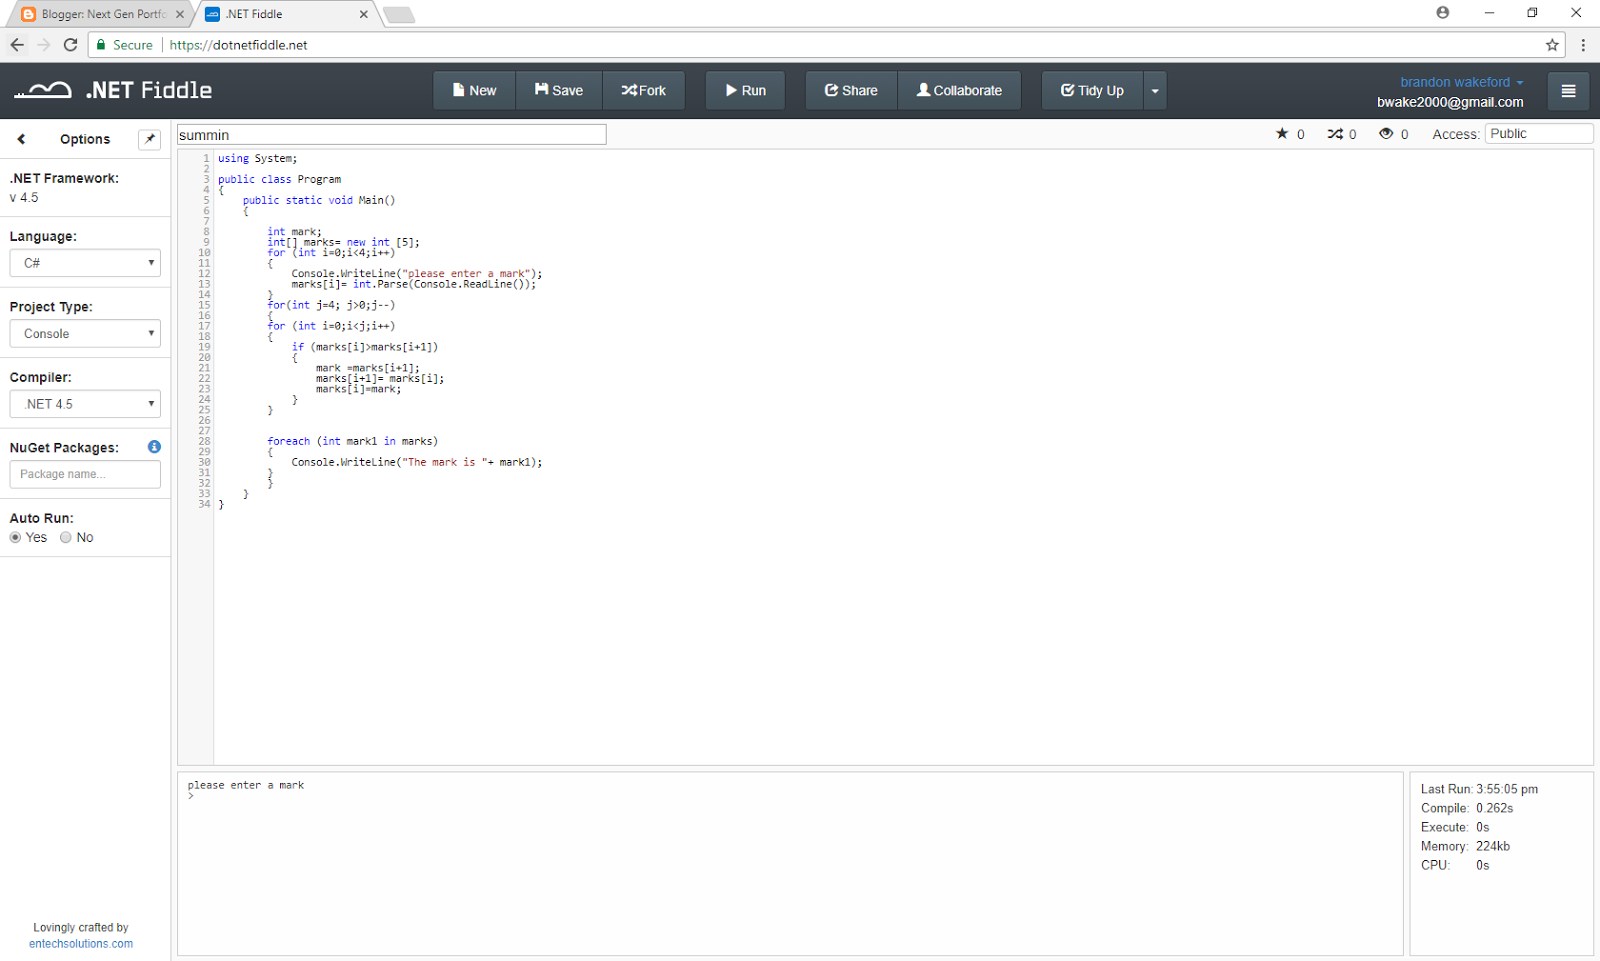
On Friday we did coding. During this lesson we were given the task of making a grade ordering system.

Creating this code would overall result in allowing you to enter 4 numbers which will be ordered from lowest to highest.
Ultimately this code worked to an extent, which confuses me. I believe it may be down to the illegal statement being wrong. The problem is that some numbers would cause an error whilst sorting.
If this was to be done again i would try to be less dependent on my fellow colleagues and try to have a better grasp at the subject as i currently feel i'm behind in comparison to where the teacher feels the class is at.
This week on Monday we continued using tools in MAYA to develop our 3D sculpting skills. We learnt to use the skills of extruding and and how to bevel shapes. In addition to this I also learnt how to add images to the program to use as blueprint whilst sculpting. The final tool we learnt that week was inserting edge loops. this tool i struggled with at first but have gotten to grips with.
After getting to know the tools we were then given the task of creating Mjornir. to those unfamiliar it is the hammer wielded by the god of thunder.

As you can see this is my final product. whilst making it i used all the tools i learnt like extruding the sides of the head to get the shape. I then beveled the head after that to give it its round feel.
Overall i am proud of my assignment and really enjoyed myself creating this. I enjoyed it because it wasn't the most frustrating and i am a fan of the film this hammer model is based on. as well as this really like the lightning background i added.
Despite this if it were to be done again i believe i would get involved in edge looping more as i tried to avoid it. Furthermore i would spend more time on creating the hilt and attempt to use special patterns to make the leather handle and overall cut procrastination to a minimum.
On Friday we did coding. During this lesson we were given the task of making a grade ordering system.
Creating this code would overall result in allowing you to enter 4 numbers which will be ordered from lowest to highest.
Ultimately this code worked to an extent, which confuses me. I believe it may be down to the illegal statement being wrong. The problem is that some numbers would cause an error whilst sorting.
If this was to be done again i would try to be less dependent on my fellow colleagues and try to have a better grasp at the subject as i currently feel i'm behind in comparison to where the teacher feels the class is at.
Next Gen Year 1 week 3
Hello blog
This week on the course throughout Monday & Tuesday we learn how to do 3D sculpting on Maya. On Maya we learnt the basics of creating 3D objects and the basics of editing them. As well as this we learnt how to rotate and move the objects properly. I was then set the task of creating a simple chair. in an attempt to impress i created 3 simple chair.
The first chair is probably the one i'm most proud of and it is a rocking chair. i found it easy up until the chair legs as i was unaware of the appropriate tools and therefore required assistance in order to create. The second chair is a sofa which again was very easy to produce. the hardest thing in making it was changing the vertices to make it look dented as if it had been used. The final chair is a cinema/ barber shop chair. this one is mostly a result of my first time on Maya being a weird custom chair i just made.
 On Friday of that week we received a visit from people who were from Next Gen. they were there to talk to us about the course we are taking and at the end whether or not to go to university or to take an apprenticeship. i enjoyed this a lot because it gave me more confidence that what i am doing is right and that university isn't always the best choice.
 As well as this we did coding on Friday. we had to create a calculator .I found this very difficult progressing only from the assistance of my peers. As a result of the difficulty i ultimately failed in creating a calculator with the product just being a hunk of un-usable code.
Subscribe to:
Posts (Atom)

-
 In this blog post i will be discussing various pieces of software i have encountered providing facts and my thoughts and opinions about them...
 -
 For this week assignment i had to create an rotoscope animation. Rotoscoping is the process of drawing over live action frame by frame to ...
